

You probably all know how to make these units, but just in case there's someone out there who doesn't, I'll give you a blow by blow description. You need one 4 1/2" by 5 1/2" rectangle, two 2 1/2" squares, and two 2 1/2" by 3 1/2" rectangles. When I'm cutting my scraps I roughly cut a rectangle at least 7 1/2" by 6" and I know I'll be able to make two units from this. I can cut the pieces accurately when I'm ready to sew.
 Sew the squares to the light rectangles and press the seam allowance towards the light side. This makes it so much easier to press later that I don't care about the 'rule' of pressing towards the darker fabric. Join the two strips together as shown
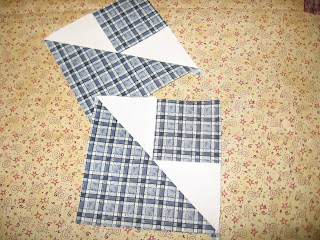
 Before you press this piece however, snip down to the seam allowance in between the two stitching lines. It doesn't matter if you cut the stitches, this part will be trimmed off later anyway. Then you can press these seams away from the dark squares too and it all lays nice and flat.
 The next step is to draw two sewing lines across the unit. There are three points to check when you line the ruler up: make sure the line goes through the very corner of the block, the place where the seams cross in the square and that the 45 degree line on the ruler runs along the edge of the block. Sometimes you may have to jiggle it a little, but these three checkpoints will make sure you're drawing in the right place.


Stitch along the drawn line; it feeds through more easily if you don't start at the corner (some machines chew the points here) and when you've sewn one, pull the piece out from under the foot, turn it around and sew back down the other line.
 I press the piece to set the seams and get it flat before lining the 1/4" mark of the ruler on the seam line and cutting the block into two. Because there is extra allowance built into the dimensions I then trim the other piece, but you could just make one cut down the middle and have wider seam allowances.
 Et voila, two units to use in whatever way you see fit, no triangles and bias seams to sew. I love it.
You need one 4 1/2" by 5 1/2" rectangle, two 2 1/2" squares, and two 2 1/2" by 3 1/2" rectangles. When I'm cutting my scraps I roughly cut a rectangle at least 7 1/2" by 6" and I know I'll be able to make two units from this. I can cut the pieces accurately when I'm ready to sew.Sew the squares to the light rectangles and press the seam allowance towards the light side. This makes it so much easier to press later that I don't care about the 'rule' of pressing towards the darker fabric. Join the two strips together as shownBefore you press this piece however, snip down to the seam allowance in between the two stitching lines. It doesn't matter if you cut the stitches, this part will be trimmed off later anyway. Then you can press these seams away from the dark squares too and it all lays nice and flat.The next step is to draw two sewing lines across the unit. There are three points to check when you line the ruler up: make sure the line goes through the very corner of the block, the place where the seams cross in the square and that the 45 degree line on the ruler runs along the edge of the block. Sometimes you may have to jiggle it a little, but these three checkpoints will make sure you're drawing in the right place. Lay the pieced unit on top of the large rectangle and pin well.

Stitch along the drawn line; it feeds through more easily if you don't start at the corner (some machines chew the points here) and when you've sewn one, pull the piece out from under the foot, turn it around and sew back down the other line.
I press the piece to set the seams and get it flat before lining the 1/4" mark of the ruler on the seam line and cutting the block into two. Because there is extra allowance built into the dimensions I then trim the other piece, but you could just make one cut down the middle and have wider seam allowances.Et voila, two units to use in whatever way you see fit, no triangles and bias seams to sew. I love it.Next post- What I Did With My Units. (what are these things called anyway?)


8 comments:
Thanks - this is really useful and was new to me!!
Just made my first two blocks...and th points look good!!
Could you please make this method printable?
I would like to have a copy to refer to when I piece more blocks.
christine
LOve this tutorial, I am going to have to try this.
Thanks so much for that! I will make some of those!
Great instructions for Triangle and Square. Lov your dogs too :-)
This is new to me too .. thanks for sharing!
My book calls them Brave new World blocks...but who knows! I use a ruler called an Easy Angle Ruler to get the lines too!
By now you may have heard this story about these blocks. I know this story is from 1992 so it's been out there a long time.
Sally Schneider, of scrap quilts fame, was riding up the ski lift with her friend Mary when she suddenly thought of this quick way to make these units. As soon as they got off the sky lift at the top of the hill she took off her skis and stamped it out in the snow to make sure it would work the way she thought it would. She put her skis back on, then started to worry that another quilter would come along, decipher her snow markings, and publish the idea before she could. So she stamped out all her marks in the snow so they were unreadable and then skid down the hill. She named them after her friend Mary who was on the ski lift with her. Sally told us this story herself at a workshop I attended in 1992. She didn't give us the details as the book wasn't published yet - just told us the story and said to watch for a new book with a piecing trick named after her friend Mary.
Post a Comment