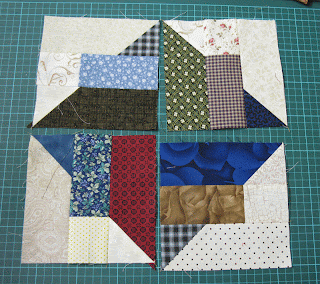
The first time I made these blocks I used 2 1/2" strips, cut at 6 1/2" widths, and a 2 1/2" square as a flippy corner. I still have all the trimmed triangles in a box and haven't got around to using them.
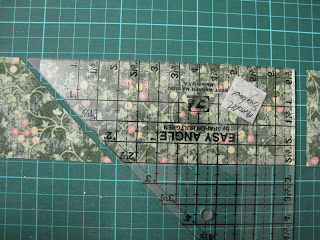
These shapes are easy to cut with the Easy Angle ruler. Just square up the end of the strip and then align the bottom edge of the ruler on the strip and cut along the sloping edge.
Rotate the ruler and line the long edge with the top of the strip, and the sloping edge where you made the first cut. Trim at the side, and there you have two identical shapes, each sloping the right way. Do not flip the ruler over, just rotate it into place.
You can make these blocks sloping two ways and both are right, as long as you are consistent in the way you lay out the strips. Either have the strips ALL wrong side facing up, or wrong side facing down. As long as they are facing the same way, they will join up. I lay a finished block on the cutting mat to make sure I was doing it right.
I cut the dark pieces wrong side up,
and also the light pieces.
However the triangles that go on the end of these strips I cut right side up, for the simple reason that then I could line up the points easily.
You can see here that I cut a strip that was folded in half .(I used the Easy Angle for these too)
The piece that faced up will fit perfectly on the larger piece,
but the piece that faced down has to be lined up with the top and sloping edge (no nice little point to match here) which seems more fiddly. Not wrong, as I can use both pieces, but if I can remember to cut them facing up I like it better. It's certainly easier to keep both pieces exactly aligned as you begin sewing, so to me it's worth it.
For each block you need the dark strip with a light triangle at the end, a 4 1/2" dark/medium strip with a 2 1/2" square sewn on to one end and a light strip with a dark triangle at the end.
Pretty easy if you've got them all sloping the right way.
When I press the strips I make the seam allowances go towards the small triangle. I don't care about pressing towards the dark fabric because I'd rather the seams nest at that point when the blocks are joined together.
Each block measures 6 1/2" unfinished and four of them together are 12 1/2" unfinished.
Now you just have to make dozens and dozens of these and play with the layout, they really are so easy to sew it's hard to stop.


6 comments:
Thank you for this mini tutorial. I really like this block & like you say many ways to set.
You are such a master at the Scrappy!
This block appeals to my eye. Thanks for sharing.
Oh, I love this block!
And a good use of the ez angle ruler
Love your method of cutting for this block, I'm going to bookmark it for future reference. Thanks so much for sharing :)
Thank you for explaining how you made the block. I love the complex pattern it makes when you put then together.
Post a Comment